Traditionally, file storage has been yet another silo within IT, introducing unnecessary complexity and suffering from the same issues of scale and lack of continuous innovation seen in SAN storage. Nutanix believes there is no room for silos in the Enterprise Cloud. By approaching file storage as an app, running in software on top of a proven HCI core, Nutanix Files delivers high performance, scalability, and rapid innovation through One Click management.
In this lab you will step through a Files deployment, manage SMB shares and NFS exports, scale out the environment, and explore upcoming Files features. The lab will provide key considerations around deployment, configuration, and use cases.
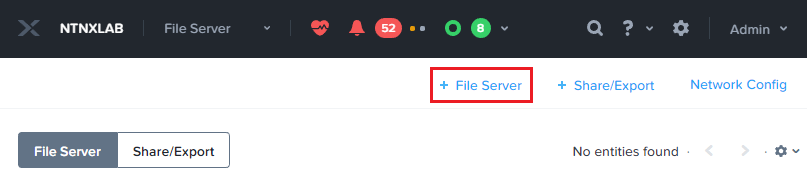
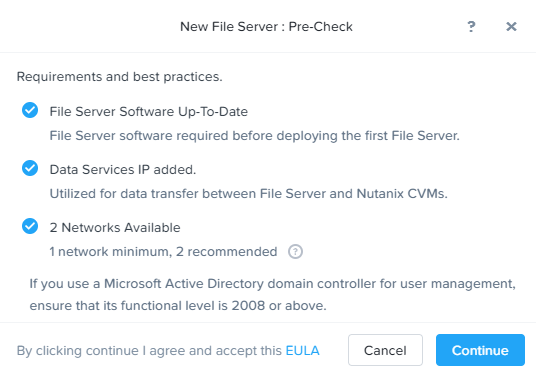
In Prism > File Server, click + File Server to open the New File Server Pre-Check dialogue.
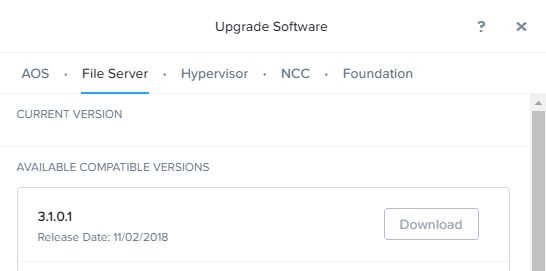
For the purpose of saving time, the Files 3.2.0.1 package has already been uploaded to your cluster. Files binaries can be downloaded directly through Prism or uploaded manually.
Additionally, the cluster’s Data Services IP Address has already been configured (10.XX.YY.38). In a Files cluster, storage is presented to the Files VMs as a Volume Group via iSCSI, hence the dependency on the Data Services IP.
Note
If staging your own environment, the Data Services IP can be easily configured by selecting > Cluster Details, specifying the iSCSI Data Services IP, and clicking Save. Currently, the Data Services IP must be in the same subnet as your CVMs.
Lastly Files will ensure that at least 1 network has been configured on the cluster. A minimum of 2 networks are recommended to have segmentation between the client side and storage side networks.
Click Continue.
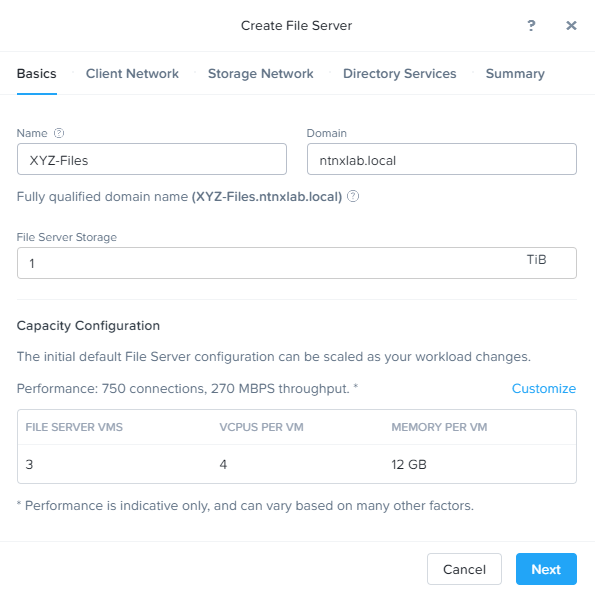
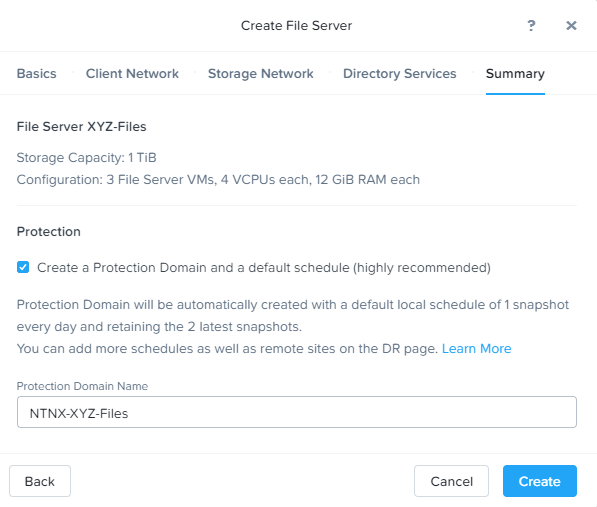
Fill out the following fields:
Name - Intials-Files (e.g. XYZ-Files)
Domain - ntnxlab.local
File Server Size - 1 TiB
Note
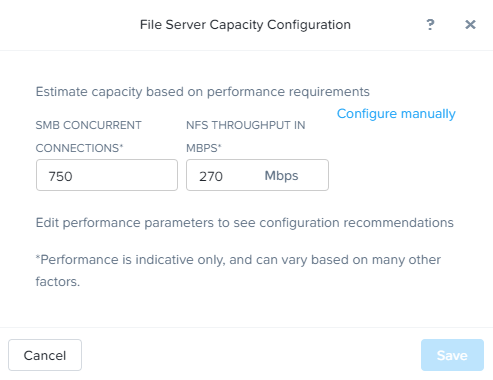
Clicking Custom Configuration will allow you to alter the scale up and scale out sizing of the Files VMs based on User and Throughput targets. It also allows for manual sizing of the Files cluster.
Click Next.
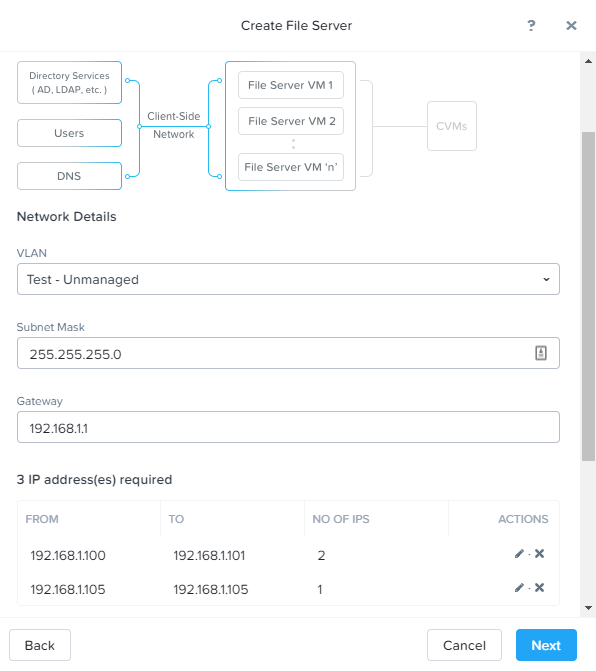
Select the Secondary - Managed VLAN for the Client Network.
Each Files VM will consume a single IP on the client network.
Note
In the HPOC environment it is critical to use the secondary VLAN for the client network if using separate client and storage networks.
It is typically desirable in production environments to deploy Files with dedicated virtual networks for client and storage traffic. When using two networks, Files will, by design, disallow client traffic the storage network, meaning VMs assigned to the primary network will be unable to access shares.
Note
As this is an AHV managed network, configuration of individual IPs is not necessary. In an ESXi environment, or using an unmanaged AHV network, you would specify the network details and available IPs as shown below.
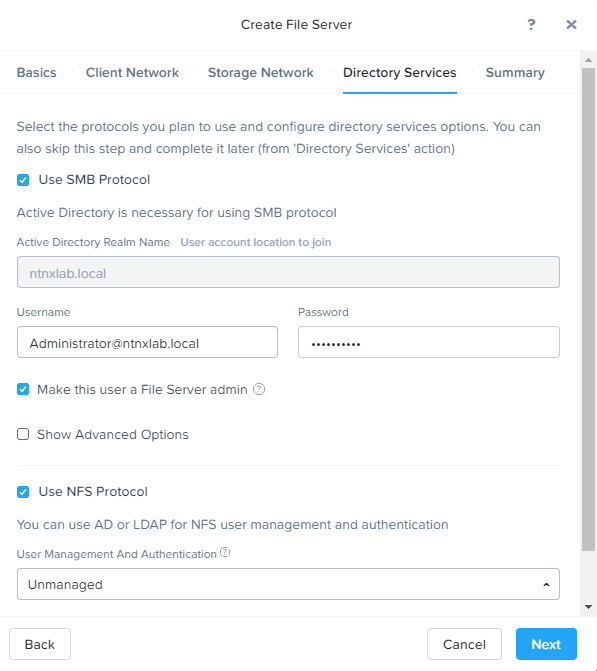
Specify your cluster’s Domain Controller VM IP 10.42.XYZ.40 (XYZ according to Cluster Access) as the DNS Resolver IP (e.g. 10.42.7.40). Leave the default (cluster) NTP Server.
In order for the Files cluster to successfully find and join the NTNXLAB.local domain it is critical that the DNS Resolver IP is set to the Domain Controller VM IP FOR YOUR CLUSTER. By default, this field is set to the primary Name Server IP configured for the Nutanix cluster, this value is incorrect and will not work.
Click Next.
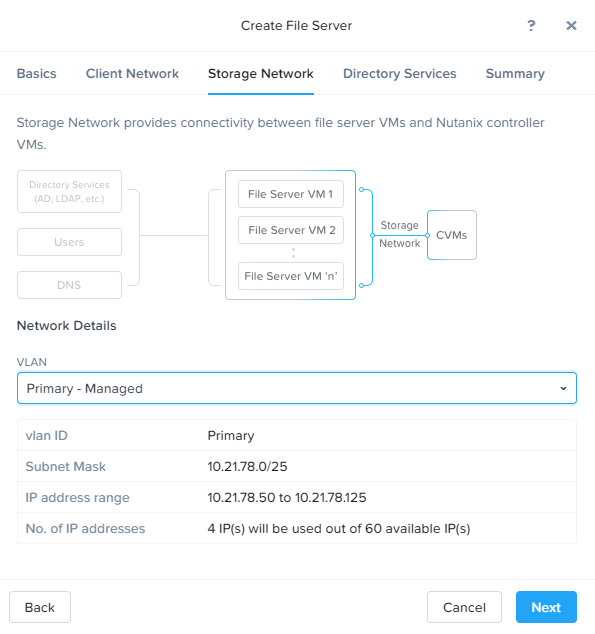
Select the Primary - Managed VLAN for the Storage Network.
Each Files VM will consume a single IP on the storage network, plus 1 additional IP for the cluster.
Similar to NFSv3, in Unmanaged mode, users are only identified by UID/GID. In Files 3.2, NFS connections will still require an NFSv4 capable client.
Click Next.
By default, Files will automatically create a Protection Domain to take daily snapshots of the Files cluster and retain the previous 2 snapshots. After deployment, the snapshot schedule can be modified and remote replication sites can be defined.
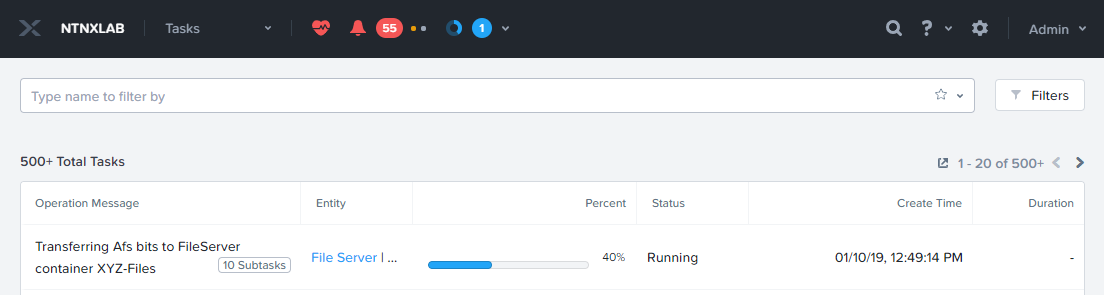
Click Create to begin the Files deployment.
Monitor deployment progress in Prism > Tasks.
Deployment should take approximately 10 minutes.
Note
If you receive a warning regarding DNS record validation failure, this can be safely ignored. The shared cluster does not use the same DNS servers as your Files cluster, and as a result is unable to resolve the DNS entries created when deploying Files.
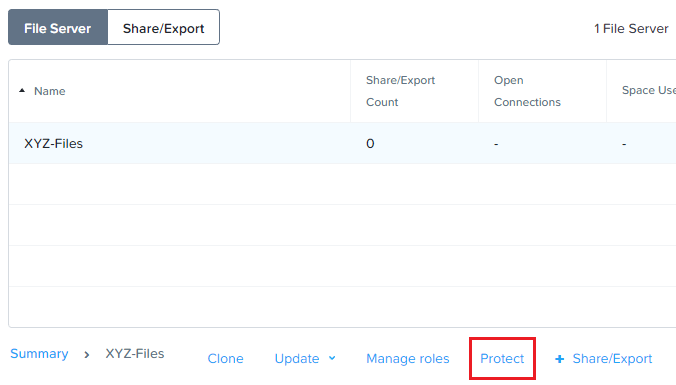
Upon completion, return to Prism > File Server and select the Initials-Files server and click Protect.
Observe the default Self Service Restore schedules, this feature controls the snapshot schedule for Windows’ Previous Versions functionality. Supporting Previous Versions allows end users to roll back changes to files without engaging storage or backup administrators. Note these local snapshots do not protect the file server cluster from local failures and that replication of the entire file server cluster can be performed to remote Nutanix clusters. Click Close.
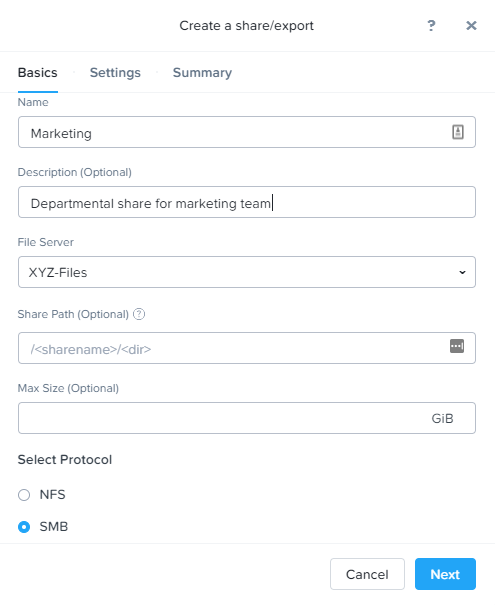
In this exercise you will create and test a SMB share, used to support home directories, user profiles, and other unstructured file data such as departmental shares commonly accessed by Windows clients.
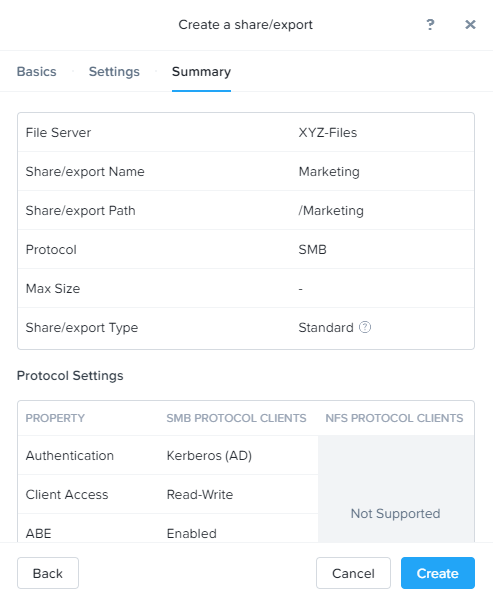
Description (Optional) - Departmental share for marketing team
File Server - Initials-Files
Share Path (Optional) - Leave blank. This field allows you to specify an existing path in which to create the nested share.
Max Size (Optional) - Leave blank. This field allows you to set a hard quota for the individual share.
Select Protocol - SMB
Click Next.
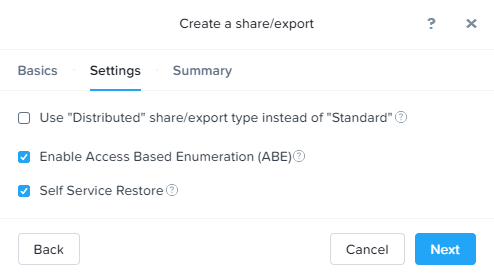
Select Enable Access Based Enumeration and Self Service Restore.
As you are creating a departmental share, it should be created as a Standard share. This means that all top level directories and files within the share, as well as connections to the share, are served from a single Files VM.
Distributed shares are appropriate for home directories, user profiles, and application folders. This type of share shards top level directories across all Files VMs and load balances connections across all Files VMs within the Files cluster.
Access Based Enumeration (ABE) ensures that only files and folders which a given user has read access are visible to that user. This is commonly enabled for Windows file shares.
Self Service Restore allows users to leverage Windows Previous Version to easily restore individual files to previous revisions based on Nutanix snapshots.
Connect to your Initials-ToolsVM via RDP or console.
Note
The Tools VM has already been joined to the NTNXLAB.local domain. You could use any domain joined VM to complete the following steps.
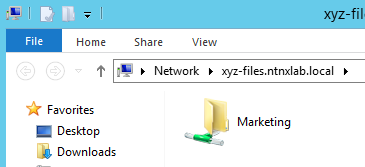
Open \\<Intials>-Files.ntnxlab.local\ in File Explorer.
Test accessing the Marketing share by opening the share and copying or creating files and directories. The NTNXLAB\Administrator user was specified as a Files Administrator during deployment of the Files cluster, giving it read/write access to all shares by default.
Managing access for other users is no different than any other SMB share.
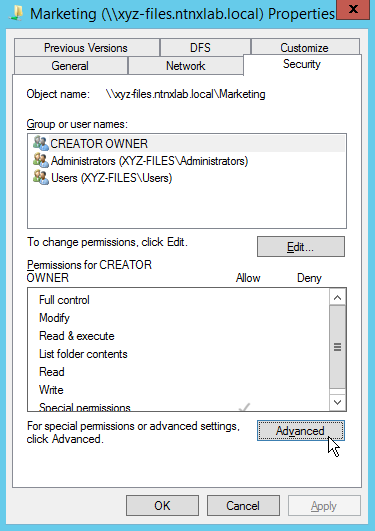
Right-click Marketing > Properties.
Select the Security tab and click Advanced.
Select Users (Initials-Files\Users) and click Remove.
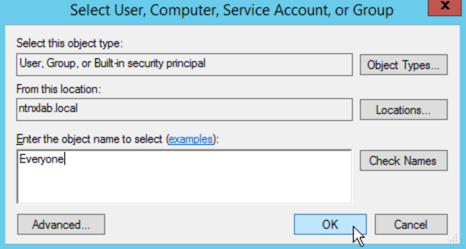
Click Add.
Click Select a principal and specify Everyone in the Object Name field. Click OK.
Fill out the following fields and click OK:
Type - Allow
Applies to - This folder only
Select Read & execute
Select List folder contents
Select Read
Select Write
Click OK > OK > OK to save the permission changes.
All users will now be able to create folders and files within the Marketing share.
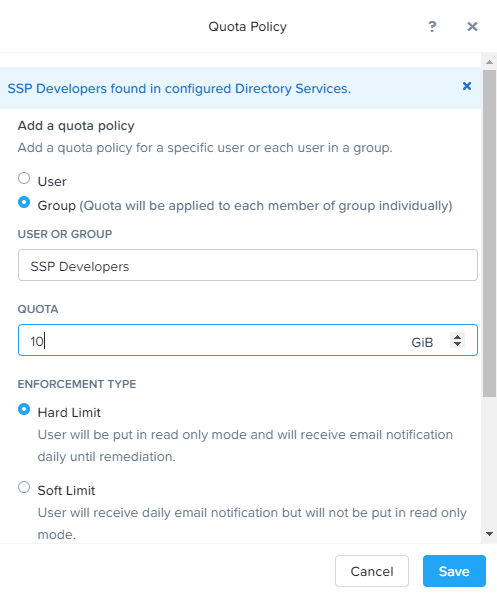
It is common for shares utilized by many people to leverage quotas to ensure fair use of resources. Files offers the ability to set either soft or hard quotas on a per share basis for either individual users within Active Directory, or specific Active Directory Security Groups.
In Prism > File Server > Share > Marketing, click + Add Quota Policy.
Fill out the following fields and click Save:
Select Group
User or Group - SSP Developers
Quota - 10 GiB
Enforcement Type - Hard Limit
Click Save.
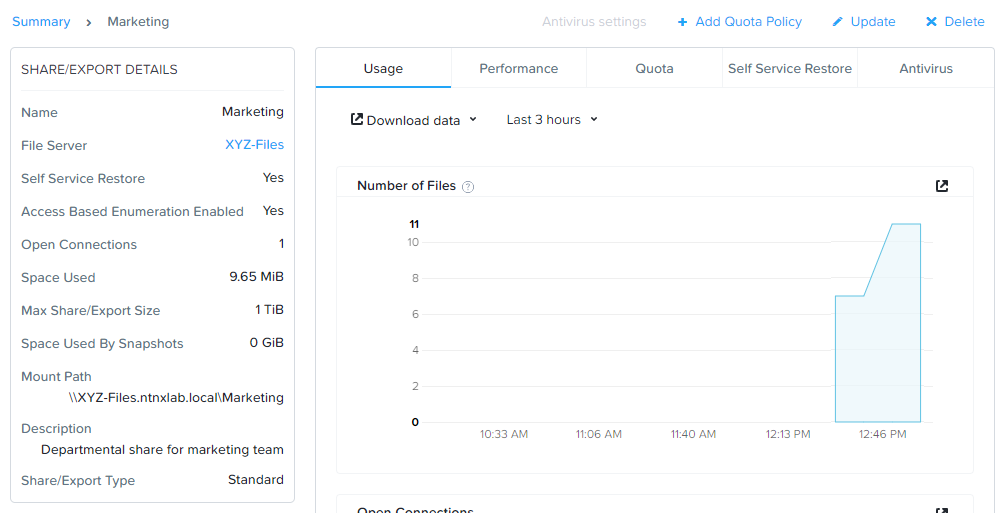
With the Marketing share still selected, review the Share Details, Usage and Performance tabs to understand the available on a per share basis, including the number of files & connections, storage utilization over time, latency, throughput, and IOPS.
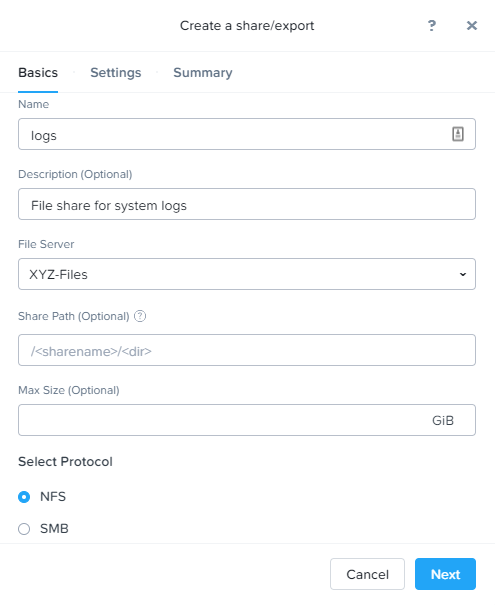
In this exercise you will create and test a NFSv4 export, used to support clustered applications, store application data such as logging, or storing other unstructured file data commonly accessed by Linux clients.
Description (Optional) - File share for system logs
File Server - Initials-Files
Share Path (Optional) - Leave blank
Max Size (Optional) - Leave blank
Select Protocol - NFS
Click Next.
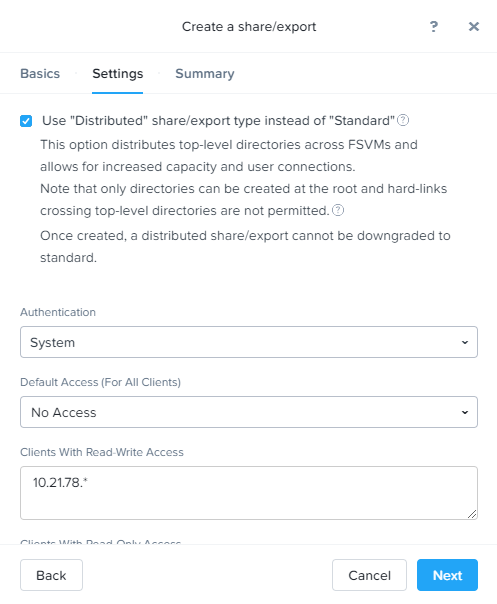
Fill out the following fields:
Select Use “Distributed” share/export type instead of “Standard”
Authentication - System
Default Access (For All Clients) - No Access
Select + Add exceptions
Clients with Read-Write Access - The first 3 octets of your cluster network.* (e.g. 10.42.78.*)
A Distributed share type is more appropriate in this scenario if you have a dedicated top level directory for each host saving their logs on this share, allowing for effective load balancing across the Files cluster.
By default an NFS export will allow read/write access to any host that mounts the export, but this can be restricted to specific IPs or IP ranges.
Files offers the ability to scale up and scale out a deployment. Scaling up the CPU and memory of Files VMs allows an environment to support higher storage throughput and number of concurrent sessions. Currently, Files VMs can be scaled up to a maximum of 12 vCPU and 96GB of RAM each.
The true power of Files scalability is the ability to simply add more Files VMs, scaling out much like the underlying Nutanix distributed storage fabric. An individual Files cluster can scale out up to the number of physical nodes in the Nutanix cluster, ensuring that no more than 1 Files VM runs on a single node during normal operation.
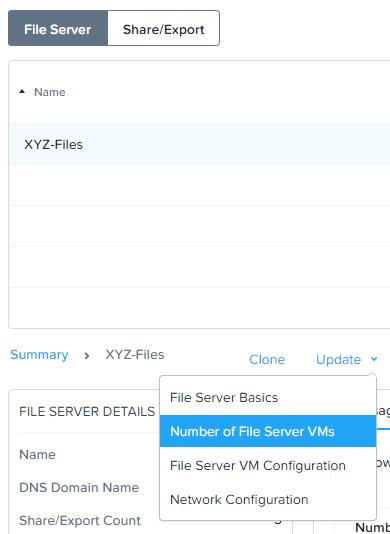
Return to Prism > File Server and select Initials-Files.
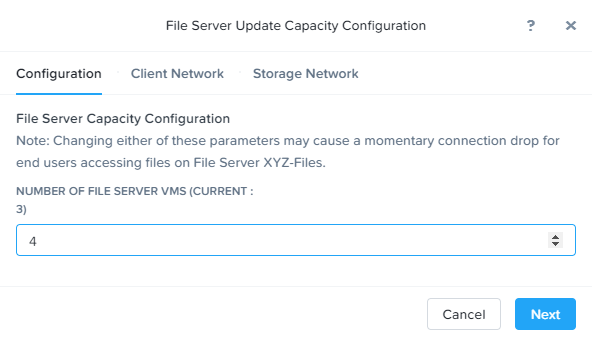
Click Update > Number of File Server VMs.
Increment the number of Files VMs from 3 to 4 and click Next.
Note that an additional IP will be consumed for both the client and storage networks to support the added Files VM.
Click Next > Save.
The cluster will now deploy and power on a 4th Files VM. Status can be monitored in Prism > Tasks.
Note
Files cluster expansion should take approximately 10 minutes to complete.
Following the expansion, verify client connections can now be load balanced to the new VM.
Connect to your Initials-ToolsVM via RDP or console.
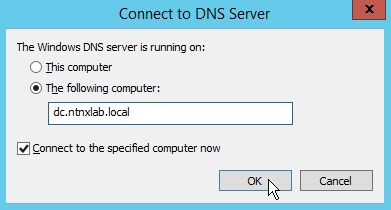
Open Control Panel > Administrative Tools > DNS.
Fill out the following fields and click OK:
Select The following computer
Specify dc.ntnxlab.local
Select Connect to the specified computer now
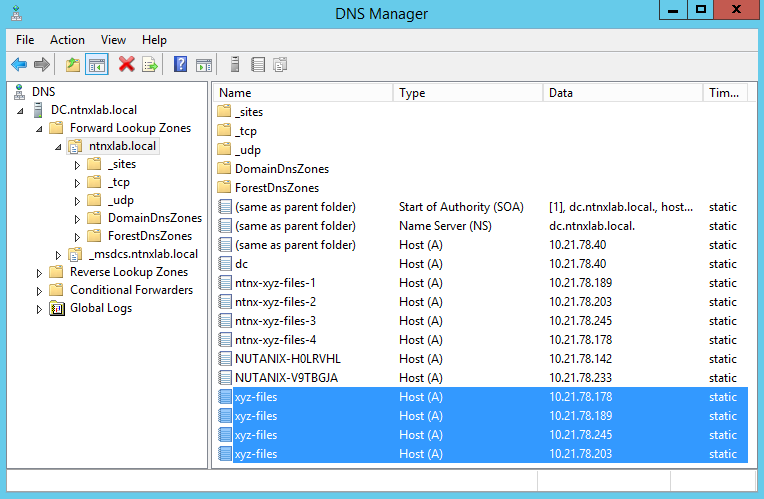
Open DC.ntnxlab.local > Forward Lookup Zones > ntnxlab.local and verify there are now four entries for Initials-files. Files leverages round robin DNS to load balance connections across Files VMs.
Note
If only three entries are present, you can automatically update DNS entries from Prism > File Server by selecting your Files cluster and clicking DNS.
What are the key things you should know about Nutanix Files?
Files can be rapidly deployed on top of existing Nutanix clusters, providing SMB and NFS storage for user shares, home directories, departmental shares, applications, and any other general purpose file storage needs.
Files is not a point solution. VM, File, Block, and Object storage can all be delivered by the same platform using the same management tools, reducing complexity and management silos.
Files can scale up and scale out with One Click performance optimization.